Hello Everyone
I have made a change to the blog. I have moved it back home to the Affordable Wonders Website I've decided to keep all of my pages on one website figuring that it just didn't make to much sense to bounce around to different web-pages to post different things and well most importantly I had already paid for the site and figured I may as well use everything the subscription has to offer.
Things that I've done while revamping the site is I've added a Video Tutorial Section which for right now only has The Basics of Crochet but I will add and Intermediate and advanced tab as I make the videos. I will also be doing a Basics of Knitting. All of my videos will be quick, short and to the point so you can go straight to crocheting/knitting.
I've also separated my into sections Affordable Wonders News which is pretty much a catchall for what is going on in my journey, Free Patterns for my members, Photo Tutorials, and Business or product reviews
Things that I still will be adding will include a written tutorial section for those that would like to print and keep in binder or on your ebook. More products in my commercial section that will include YARN! My favorite part I plan on actually keeping the yarn in stock and selling it at bundle rates. The yarns you will find are you favorite label brands that they don't keep instock at your local craft store. And priced to where you don't have to wait for a SALE! And for those of you that would like to purchase any of my handmade goods or patterns just visit my Etsy tab.
As usual if there is a product that you would like but don't see listed just contact me. I can get a hold of just about all crafting supplies I will happily give you a quote I just can't add them all it would take an army and I own run and operate Affordable Wonders by myself while being a mom and wife.
Well I think that is all that I have for now I sure do hope that you come on by to Affordable Wonders and check out the new layout!
Showing posts with label Easy Knit free Pattern. Show all posts
Showing posts with label Easy Knit free Pattern. Show all posts
Friday, August 12, 2011


Friday, July 29, 2011
FO Friday Classy Cabled Guest Book
Good Morning All!
Well I'm on a roll! This is my first FO Friday post!! I'm still pumped from my first WIP Wednesday. I want to thank everyone for being so welcoming I love this community and being part of it.


Well on to my FO I designed this because I wanted to achieve a couple of things in one design.
1) I wanted it to be easy enough for a beginner
2) Interesting enough for a beginner to learn a new technique and have some instant gratification
3) Something a more seasoned knitter could whip up quickly as a unique gift.
4) To me the most important lol not use up to much yarn (since I was using Alpaca)
So the story: I had a couple of skeins of Alpaca yarn. I have been caressing this yarn for months I didn't have enough to make anything big, which trust me I would have loved to make myself a sweater or even my daughter for that matter but that would mean I'd have to purchase some more yarn and right now I just want to work with what I have to chisel down some of my stash (borderline yarn hoarder). I knew I didn't want to make a cowl, or fingerless gloves, hat all these are so common out there and I just wanted to come up with something less common yet functional. And I also wanted something that could be gifted to Men and Women alike.
Well then it hit me some friends of ours have been house hunting. So my wheels started turning for house warming gifts. My Classy Cabled Guestbook is one of a "For the Home" series that I will be releasing.
The Classy Cabled Guestbook is knit in bulky weight (5) Alpaca yarn Less than 120 yards. It is a simple knit that works up super fast and has a pretty shell crochet border.
Things I didn't think about but in the end didn't really matter. Alpaca is too soft lol as if I didn't know. It doesn't matter because this notebook isn't meant to keep in your pocket book or anything. It is meant to keep at a table or buffet and for guest to sign and leave goofy notes about your dinner party. But if firmness is something that you definitely want then you may want to use a firmer yarn with less drape. I even knit this in much smaller needles than the yarn called for and it still turned out very drapey. I suppose you could knit or crochet a pocket to fit cardboard in I didn't because it didn't matter to me it still looks great in my eyes :)
 So what do you guys think?!?!? Have a wonderful weekend all and don't forget to stop by all the other Bloggers participating in FO Friday!

Well I'm on a roll! This is my first FO Friday post!! I'm still pumped from my first WIP Wednesday. I want to thank everyone for being so welcoming I love this community and being part of it.


Well on to my FO I designed this because I wanted to achieve a couple of things in one design.
1) I wanted it to be easy enough for a beginner
2) Interesting enough for a beginner to learn a new technique and have some instant gratification
3) Something a more seasoned knitter could whip up quickly as a unique gift.
4) To me the most important lol not use up to much yarn (since I was using Alpaca)
So the story: I had a couple of skeins of Alpaca yarn. I have been caressing this yarn for months I didn't have enough to make anything big, which trust me I would have loved to make myself a sweater or even my daughter for that matter but that would mean I'd have to purchase some more yarn and right now I just want to work with what I have to chisel down some of my stash (borderline yarn hoarder). I knew I didn't want to make a cowl, or fingerless gloves, hat all these are so common out there and I just wanted to come up with something less common yet functional. And I also wanted something that could be gifted to Men and Women alike.
Well then it hit me some friends of ours have been house hunting. So my wheels started turning for house warming gifts. My Classy Cabled Guestbook is one of a "For the Home" series that I will be releasing.
The Classy Cabled Guestbook is knit in bulky weight (5) Alpaca yarn Less than 120 yards. It is a simple knit that works up super fast and has a pretty shell crochet border.
Things I didn't think about but in the end didn't really matter. Alpaca is too soft lol as if I didn't know. It doesn't matter because this notebook isn't meant to keep in your pocket book or anything. It is meant to keep at a table or buffet and for guest to sign and leave goofy notes about your dinner party. But if firmness is something that you definitely want then you may want to use a firmer yarn with less drape. I even knit this in much smaller needles than the yarn called for and it still turned out very drapey. I suppose you could knit or crochet a pocket to fit cardboard in I didn't because it didn't matter to me it still looks great in my eyes :)

Friday, June 17, 2011
T-Shirt Yarn Tutorial
I know that there are several tutorials out there for T-shirt Yarn, but I am writting this one up for my wicked Step-Mother as she is being super awesome and making me some with her used T-shirts! Also I wanted to have this tutorial up for some future patterns/ projects that I will be working on and posting so I wanted to have a quick reference for you guys to have... Plus I didn't want you guys to have to leave my page to find instruction muaahahaha (supposed to be that scary laugh! lol)
Materials:
Used t-shirts
Scissors
List of Materials that make life MUCH easier:
Used t-shirts that do not have side seams
rotary cutter
self healing rotary mat the bigger the better
omnigrid ruler 6"x 24" works great
yarn ball winder
If you don't have the extra materials no biggy you can still make t-shirt yarn. The extra materials just make it faster and more accurate. As the self healing mat hat a measurement grid on it and so does the ruler so you can make all of your strips the exact same size. And it saves your hands I had so much to make that I would have gotten blisters using scissors for all of it. Ok so on to the instructions.
Lay your t-shirt out in front of you. Try to get all the wrinkles out and make it as straight as you can.
![]() And now cut straight across the top from right under the sleeves so that you are left with a tube (the torso of the t-shirt)
And now cut straight across the top from right under the sleeves so that you are left with a tube (the torso of the t-shirt)
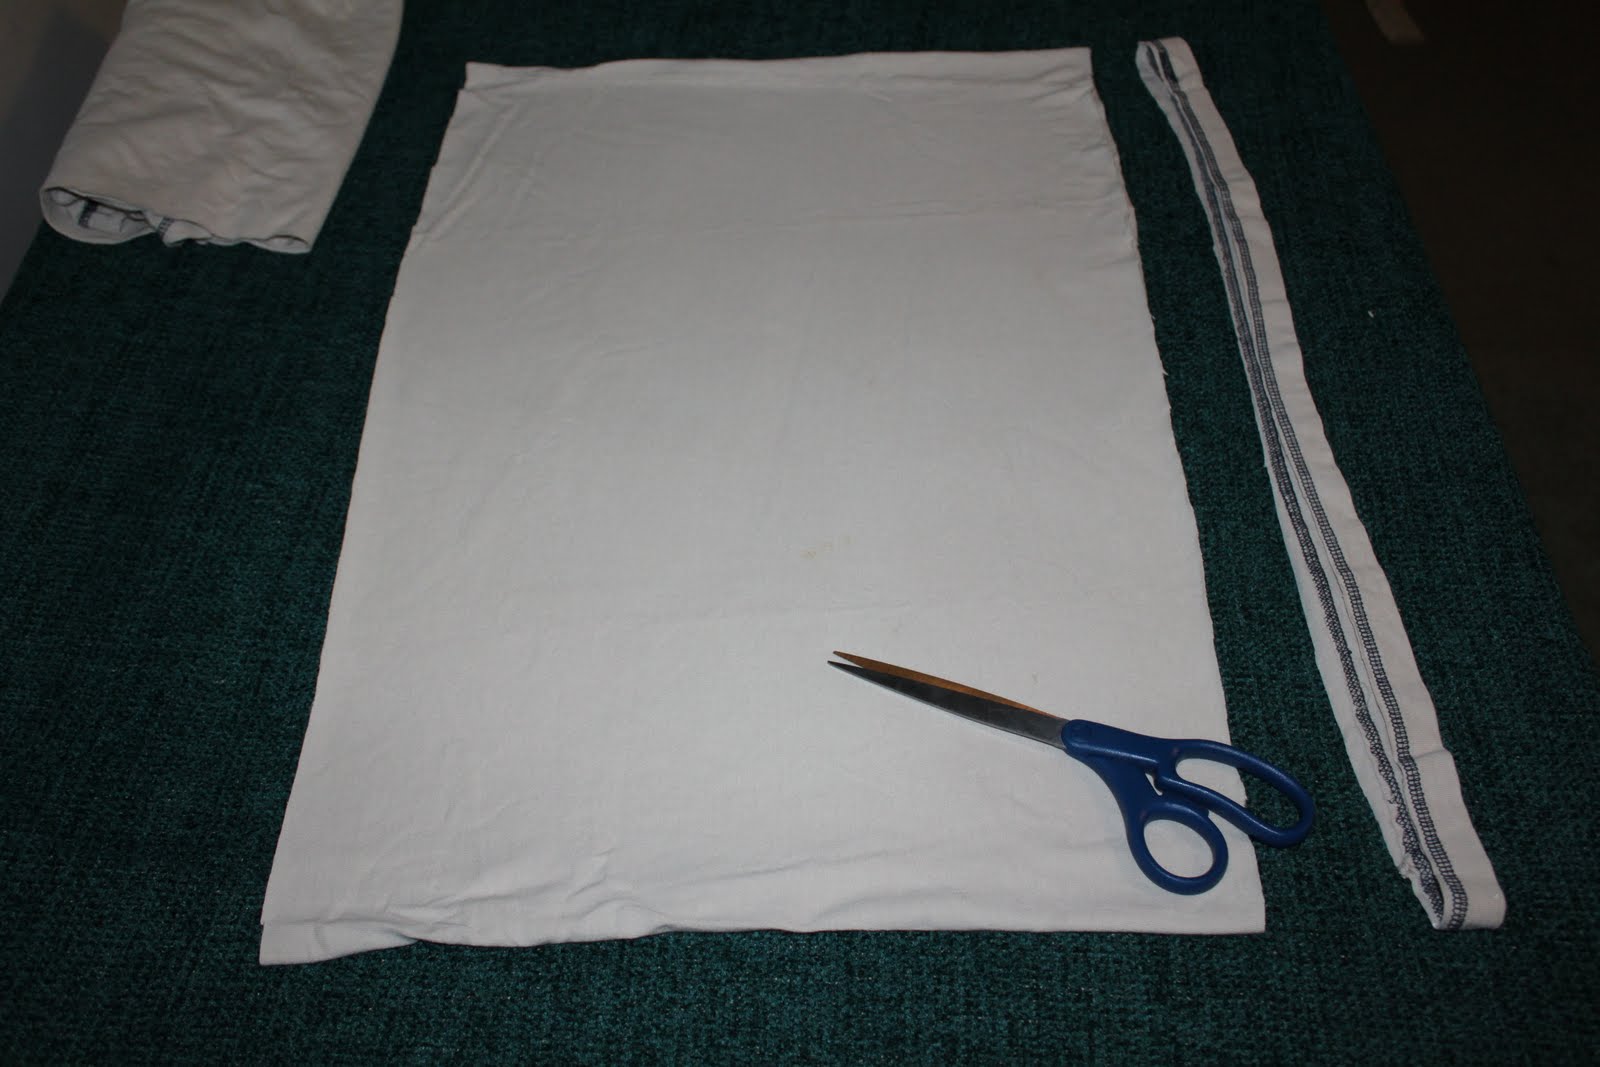
![]() Now Cut the bottom seam off
Now Cut the bottom seam off
![]() With the tube you have left cut strips of about 1" but DO NOT cut all the way up leave about 1 " uncut so you end up with something that resemble a hula skirt :) (depending on how thick or thin you want your yarn to be) This is also where a self healing mat, ruler and rotary cutter come in handy.
With the tube you have left cut strips of about 1" but DO NOT cut all the way up leave about 1 " uncut so you end up with something that resemble a hula skirt :) (depending on how thick or thin you want your yarn to be) This is also where a self healing mat, ruler and rotary cutter come in handy.
![]()
![]()
![]()
![]()
![]()
![]()
![]()
![]() Now the fun part. Grab your fabric and tug on it. Continue tugging to the end of your strip. What this does is curl your strip. To make it look like a long tube or "yarn". This also makes your already long strip into a LONGER strip of yarn.
Now the fun part. Grab your fabric and tug on it. Continue tugging to the end of your strip. What this does is curl your strip. To make it look like a long tube or "yarn". This also makes your already long strip into a LONGER strip of yarn.
![]() Then all you have to to is ball it up! If you have a yarn ball winder it comes in handy here especially if you have a lot of t-shirts to do. (BTW I sell yarn ball winders manual and electronic just visit my website and I'll be happy to send one your way!)
Then all you have to to is ball it up! If you have a yarn ball winder it comes in handy here especially if you have a lot of t-shirts to do. (BTW I sell yarn ball winders manual and electronic just visit my website and I'll be happy to send one your way!)
![]() And that's it. I hope you guys enjoyed and understood this tutorial. I'd love to hear your comments. Stay tuned for patterns using t-shirt yarn.
And that's it. I hope you guys enjoyed and understood this tutorial. I'd love to hear your comments. Stay tuned for patterns using t-shirt yarn.
Materials:
Used t-shirts
Scissors
List of Materials that make life MUCH easier:
Used t-shirts that do not have side seams
rotary cutter
self healing rotary mat the bigger the better
omnigrid ruler 6"x 24" works great
yarn ball winder
If you don't have the extra materials no biggy you can still make t-shirt yarn. The extra materials just make it faster and more accurate. As the self healing mat hat a measurement grid on it and so does the ruler so you can make all of your strips the exact same size. And it saves your hands I had so much to make that I would have gotten blisters using scissors for all of it. Ok so on to the instructions.
Lay your t-shirt out in front of you. Try to get all the wrinkles out and make it as straight as you can.



Continue cutting in one inch strips all the way across. When you are done it should look like this

Here is a close up of the top of the shirt (where you should have left 1" uncut)

Now "open" up the top where it was left uncut so that it looks like this

Now here is another important part with a pair of scissors cut diagonally from the 1st strip on the right to the 2nd strip on the left. Then the 2nd strip on the right to the 3rd strip on the left. And continue in this manner to the end. Leave the 1st strip on the left uncut for now do that at the end to avoid confusion.What this will do is give you a long strip of continuous "yarn".
This photo is the 1st cut

This photo is the second cut

Now when you are done you will have a LONG strip of 1"inch fabric


Wednesday, April 13, 2011
Easy Knit Hairbow Pattern
I Have a ton of scrap yarn left from other projects. I sat there and looked at it and wondered what could I do with all this scrap. And of course a lot of little project came to mind well this is the first of many scrap projects. HAIRBOWS I have a daughter as you may already know. Well I thought I could just make her a ton of Hairbows to match just about anything that she has to wear. I will also post instructions for a crocheted version. So here goes!
Please do not post instructions to this project without first speaking to me. You may post a link back to my blog if you'd like. Please do not sell items made by my patterns. Thank you.

Knit Bow final measurement will be 21/2" x 3"
1) CO 17 and work in Garter (knit every row) for 4 rows
2) P 1, K 15, P1 Turn
3) P 17 Turn
4) Repeat rows 2 and 3 for 10 more rows
5) K 4 rows and BO
Weave in ends.
Fold a you would a paper fan and with a strand of matching (or non Matching) Yarn about 12" wrap around the middle several times to secure it at tie a knot and weave in the end. Then fan out and shape your bow and slip an alligator clip thru the bottom of your bow where you wrapped the strand of yarn. I don't do anything to keep the alligator clip permanently there so that I can use the same alligator clip on all of my bows.


And that's it your done! You can easily make this bow bigger by adding Cast on stitches and more rows. You can also get creative and sew buttons or beads to your bow. Well I hope you liked this short super easy project I look forward to hearing your comments!
Please do not post instructions to this project without first speaking to me. You may post a link back to my blog if you'd like. Please do not sell items made by my patterns. Thank you.
Knit Bow final measurement will be 21/2" x 3"
1) CO 17 and work in Garter (knit every row) for 4 rows
2) P 1, K 15, P1 Turn
3) P 17 Turn
4) Repeat rows 2 and 3 for 10 more rows
5) K 4 rows and BO
Weave in ends.
Fold a you would a paper fan and with a strand of matching (or non Matching) Yarn about 12" wrap around the middle several times to secure it at tie a knot and weave in the end. Then fan out and shape your bow and slip an alligator clip thru the bottom of your bow where you wrapped the strand of yarn. I don't do anything to keep the alligator clip permanently there so that I can use the same alligator clip on all of my bows.
And that's it your done! You can easily make this bow bigger by adding Cast on stitches and more rows. You can also get creative and sew buttons or beads to your bow. Well I hope you liked this short super easy project I look forward to hearing your comments!
Subscribe to:
Posts (Atom)